…but I’m kinda in love with it. Thanks to a friend/coworker I’m cautiously dipping my toe into the world of “functional programming”. I’m still not 100% certain I get the full gist of functional programming but, to my newb mind, I’d explain it as programming without consequences. Functions only depend on their inputs and external forces/state cannot muck with your function.
Apparently this makes it easier to predict what’s going on, but I still have issues reading what I just wrote. Parenthesis all the way down dudes. Also prefix notation is technically useful, but warping my poor little brain.
So 1 + 1 in Clojure is actually written as (+ 1 1). Makes sense, right? Sorta, except for the years and years of basic math classes that NEVER LOOKED LIKE THIS. Oh my brain. But it’s kinda cool that instead of 1 + 2 + 3 + 4 I only need to write (+ 1 2 3 4).
But seriously. This is a function in Clojure:
1
2
3
4
5
(defn adder
[x y](+ x y))(adder 3 4);; 7</pre>
Wat? So the first line defines the function name. The second line is the parameters that you give to the function and then the last line adds those two parameters together. I then call the function on line 5 with the arguments 3 and 4 and then the semicolons denote comments and I use that do show what the output of the function is… 7.
As a super ridiculous aside. Parameters vs arguments? Parameters are the things that you define with the function. So x and y on line 2 are parameters. Arguments are what you pass to the function when you what to actually use it. So 3 and 4 on line 5 are arguments. Now go forth and be awesome!
So how do you be Clojure learners too? Currently I’m running through the clojurebridge curriculum on my own. Clojure in 15 minutes looks like a decent-y rundown of most of my syntax options. If you don’t want to put anything on your system yet, or just want to mess around with the syntax, there’s always Try Clojure which lets you program from your browser. And I’ve bookmarked Clojure for the Brave and True mostly for the title, but I haven’t really read any of it yet.
So I had this problem at work. I’m running a virtualenv instance on our main git repo for all my python packages. The global .gitignore obviously doesn’t know about it the way it knows to filter out node modules and other fun bits of localization and I sure as heck don’t want to add my own one line fix to the global .gitignore file.
So what’s a girl to do? Does she just ignore that one annoying untracked file line every time she does a git status from the terminal? Nope, she uses git exclude.
1
$GIT_DIR/info/exclude
So for me this meant I had to create a info folder in my .git folder in the repo. Then I created a file called exclude (no file extension). The syntax in that file is exactly like the .gitignore file, it’s just very very local (to your computer and only for that repo).
Everyone (who’s used angular or seen an angular tutorial) has seen the awesome realtime angular search. This is used with a filter property, but there are more complex things you can use with filtering. On my Hack Reactor hackathon project I used filtering for just about everything. From picking out individual objects to finding just the right combinations and I learned some awesome tricks and some pitfalls to avoid.
One of the coolest things you can do is filter by lots of things together. The filter ends up looking a lot like a JavaScript object:
They way this works the best is if you have a number of searches all on one page to pull together. Say a regular text search (text above) that needs to interact with a drop down menu filter (category). Just throw all the variables into one object and filter on that.
Another neat thing you can do is filter by IDs. For example, if you want to have individual pages for each item, you can normally just call to it based on the $index of that item. But what if you have searched and filtered your list of data into a more manageable grouping? Index doesn’t work! It’s pulling the index of the new filtered list and not the actual index that data point has in the entire data structure.
My fun work around for this was to send the object that you had selected to a function within my Angular controller for that page and find the data that way.
Of course this requires something in the $rootScope, but that also benefited me because I wanted to have access on a separate page to all of the data points a user chose. That way I could fill out a detailed report of the chosen bookmarks with user defined notes all on one screen.
So my team’s most recent application, Helix, involved genome visualization. We integrated it with the 23andme API, but still needed a way to find out interesting information about specific RSIDs (used by researchers and databases to refer to specific base pairs of DNA). By far the most useful and open source repository of genetic information is SNPedia, but I needed access to lots of information and to integrate calls to specific SNPs. Basically I needed an API. So being ever resourceful, I decided to make my own.
Tools for the task were an easy choice. I needed a small fast server that I could implement a web scrapper on. I have always wanted a reason to use BeautifulSoup, but it’s a Python library so I knew it would be easier to build a Python server to run the API endpoints. I chose Flask because of its lightweight nature and how much it reminds me of a Node/Express server at times.
Thankfully there are some really good tutorials for both Flask and BeautifulSoup, my favorites (and the ones I referenced when I hit weirdness) were Designing a RESTful API and Website Scraping with BeautifulSoup. Both of these tutorials said a lot of things better than I could have myself.
Do you have all the data and none of the visuals? Do you just want a pretty, fast way to compare lots of data that centers around maybe just a handful of moments?
D3.js can help you tame all of your data and d3.rollup is especially useful if you have lots of data that you need to combine into just a couple of data points. All it takes is a couple of (pretty long) lines of code and you will have an awesome visual that’s very customizable.
Lets start with a really straightforward example of a rollup. In all of these examples, I’m using code straight from my HeatVote project, which requires me to pull voting data from our server API that I receive as a JSON blob. Here’s an example entry:
1
2
3
4
5
6
{ video_id: 'T-D1KVIuvjA',
timestamp: 2,
vote: 1,
id: 1,
createdAt: Sat Dec 21201314:55:42 GMT-0800 (PST),
updatedAt: Sat Dec 21201314:55:42 GMT-0800 (PST) }
Now obviously there are a bunch of these, and technically there are easier ways to do this, but to show off the structure of a rollup, lets count how many entries we had in our database using a d3 rollup!
1
2
3
4
5
var total = d3.nest()
.rollup(function(d){return d.length;
})
.entries(data);
Remember, data here is my array of JSON entries, so in our rollup function the d is just shorthand for all of the data. This isn’t a very interesting example though, lets take a look at something that really shows off the beauty of a d3 rollup.
Now there is a lot going on in this very compact few lines, so well go through them one by one, but the result is that averages is equal to an array of objects with the properties key (that is equal to each unique timestamp) and value (that is equal to the mean of all votes at that timestamp).
So lets break it down:
.key(...) is just used to tell the function what our keys are, only grabbing unique values of that property.
.sortKeys is just a prettiness thing, it sorts my keys into an order (when they’re pulled off the server the only order is by the time they were created on the database).
and finally our lovely .rollup(...). Now instead of d being an array of the whole data, it’s now an array of only the data for each individual key (so all of the data with the same timestamp). The inner function d3.mean takes a specific property from all of the data for each key and averages them up. And that, is d3 rollup in a nutshell, it’s really lovely at coercing relationships out of your raw data and you can obviously do a lot more with it that just averaging things. The d3 nest docs are probably the next best place to look to get your hands dirty (.rollup is a property of nest).
While it might be possible that I’m the only person out there who didn’t want to hassle with creating a Postgres database on my computer that needed to be passed around to my project-mates, I have a feeling there is one lost soul in the universe besides me who might find this useful. When I first tried to use Heroku’s PostgreSQL database add-on the only documentation I really found was for attaching it to existing Heroku apps. I just wanted a dev environment and currently don’t have plans to deploy the app with Heroku so I just wanted to “borrow” their free level of database storage.
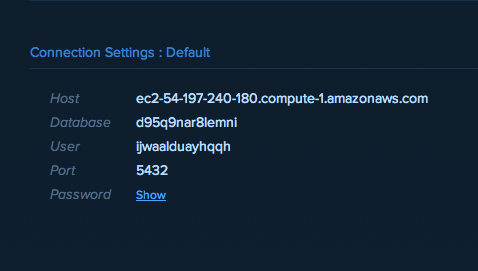
It is shockingly easy. All I needed to do was log in to my Heroku dashboard and click the databases tab. From there I created a new database (be sure to choose the almost hidden Dev Plan (free) option on the lower left). Once it was done spinning up if you click on it, you are taken to a page with all the login info you could ever need:
I just plugged all of that info into Sequelize (see my previous post), because I’m using Heroku Postgres, I had to make sure I used the pg.native options in both Node and Sequelize.
A few caveats! For a Mac, if you just install the Postgres standalone app from PostgreSQL, life will not be pleasant (I learned this the hard way). The easiest way to make life happy is to use Homebrew to install Postgres. Please have Homebrew, it makes life super easy. All you need to do then is brew install postgresql.
The second awesome thing about Heroku Postgres is that although I’m only on the free version, I can still easily log in to my database from the command line and change things. On the page with the connection info, click the double arrows on the right and choose URL. Now, in Terminal type psql DATABASE_URL_HERE and voila! direct access to your database.
If you haven’t messed around with a ORM (Object Relational Mapper, a program that maps your code to a database) before, Sequelize is a really straight forward one to start with.
Once I had my server set up (and installed the sequelize dependencies). This was the line of code I needed to use to create a new table for my current group project. Sequelize automatically includes extra columns like unique id and created at/updated at timestamps (there are ways to tell it not to too).
The rest of the initial set up is easy too, but it’s well documented over in the Sequelize docs. The fun part comes when you can start to make your database more modular. The first thing I did was to take out the actual username/password information from my database connection. I stored them as an object in a separate JavaScript file (so I could add it to .gitignore and not share my passwords with the world).
1
2
3
4
5
6
7
8
9
10
11
//module.exports allows us to use this code in other places as a node module,//we'll see it again when I make the database calls modular
module.exports = {
database: 'database_name',
username: 'username',
password: 'secret_password',
host: 'host_url',
port: 5432,
dialect: 'postgres', //obviously you don't have to use PostgreSQL
native: true//required for Heroku Postgres (I'll cover that in another post)
};
I saved that snipped to a file called db_config.js at the root directory and then created my main database module in the subfolder /controller/ called database.js. So to have access to the private config object, all I need to do is set up my dependencies, import the db_config file, and I can start using my config variables to connect to my database:
1
2
3
4
5
6
7
8
9
10
var Sequelize = require('sequelize');
var pg = require('pg').native; //again this line is specific to using a Postgres databasevar config = require('../db_config');
var sequelize = new Sequelize(config.database, config.username, config.password, {
host: config.host,
port: config.port,
dialect: config.dialect,
native: config.native //Heroku Postgress again
});
Now between that code and my creating a table I have full access to a database, but now I need to get this all into my main app.js simple server I created with Node/Express. This is a super easy leap. First I create my functions to send and retrieve data in /controller/database.js:
1
2
3
4
5
6
7
module.exports.createVote = function(req, res){//code to bundle up the created object and save it do the database
};
module.exports.getVotes = function(req, res){//code to find votes based on specific requests from the user
};
Now to have access to these functions (which are a part of the database.js node module, thanks to the module.exports object which is a feature of Node) I only need to require database.js in my main server app and call the functions where I need them:
1
2
3
4
5
var database = require('./controllers/database');

//many lines later
app.post('/votes', database.createVote);
app.get('/votes/:vidID', database.getVotes);
The /votes/:vidID is a handy trick of Express to pass information to the server. The value gets attached to the req.param.vidID property so I can use it when I request specific information from the server. For example if I wanted to query for results from a video ID of 123 I would send a post request to /votes/123 and then my req.param.vidID === 123.
One last trick, in Sequelize when you query the database you get back quite a few more rows than you might expect. When I query my voteTable (the one I only explicitly created three columns for?) I get back something that looks like this monster:
And that’s just ONE entry in the database! To fix that add an option to your sequelize query: {raw: true} so the query would look like:
1
voteTable.findAll(query, {raw: true})
And one entry of output would be:
1
2
3
4
5
6
{ video_id: 'T-D1KVIuvjA',
timestamp: 2,
vote: 1,
id: 1,
createdAt: Sat Dec 21201314:55:42 GMT-0800 (PST),
updatedAt: Sat Dec 21201314:55:42 GMT-0800 (PST) }
That is enough database tricks for today. If you want to just stare at my code for a while to create & retrieve votes from our database you can find my gist here (with sanitized login info for the db_config). The real (still being modded by the team) code is forked on my GitHub. I have a few more of these in the works from my adventures slinging code and I hope to post a few more before Hack Reactor starts back up and I lose all free time again.